
Grannie Heart Tutorial
Following my post and pattern for the Grannie Heart Bunting, I thought the hearts would make an excellent starting subject for my first tutorial.

So, here we go. My Grannie Heart Tutorial...
★★☆ - Improver
A few notes before we begin:
Yarn: I used Debbie Bliss Baby Cashmerino and a 3.5mm (E) hook, but you can use whatever yarn you like, just use the recommended hook size for your yarn.
Terms: I've used British crochet terms throughout, so I must apologise in advance to anyone who is used to using the American terms.
To clarify, the British terms that I have used are below in black and the American terms are given in green in brackets:
British (American)
Slip Stitch (Slip Stitch)
Chain (Chain)
Double (Single)
Treble (Double)
Double Treble (Treble)
WRITTEN PATTERN - If you'd like the written directions only, please visit the Cherry Heart Boutique and download the Granny Heart Bunting pattern, which contains the heart instructions.
☆ French instructions for the tutorial are now available - with many kind thanks to Katty at Sur Le Blog de Mes Loisirs for providing the translation.
Each step is numbered and corresponds to the picture numbers and you should (fingers crossed) be able to make the pictures even larger by clicking on them.

Foundation ring:
1. Make a slip knot
2. Chain 6
3. Insert the hook into the first chain you made, an join the chain with a slip stitch
4. Which will make a loop like this

Round 1:
5. Chain 5 (this will count as 1 treble and 2 chains). Then make 3 trebles into your foundation loop and then chain 2, we will need to repeat this twice more, so go ahead and do another 3 trebles and 2 chains, then another 3 trebles and 2 chains
6. To finish off this round, you need to do a further 2 trebles into the foundation loop and then join to the beginning of the round, by making a slip stitch into the 3rd chain of the chain of 5 that you made at the start of this round.
7. You should have something that looks like this. You have 4 'clusters' made up of the 3 trebles and 4 'corner spaces' where we chained 2.


17. We need to repeat this so, *make another 2 double trebles and 1 chain and then repeat from the * twice more, so you have 4 sets of the double trebles all together. You then need to join this to the row below by making a slip stitch into the middle treble of the last cluster of the row below (see the pic).
18. Now we need to slip stitch round to the next position. Make a slip stitch into the next treble and then you'll need to make two more slip stitches, one into each of the corner chain.
19. These can be a little awkward to get your hook into, I use the pointing end first and it normally goes in after a wiggle! (Pic shows me hooking into one of the corner chains).
20. One final slip stitch into the first treble after the corner and then we are ready to make another heart shaped bump on this side of the square.

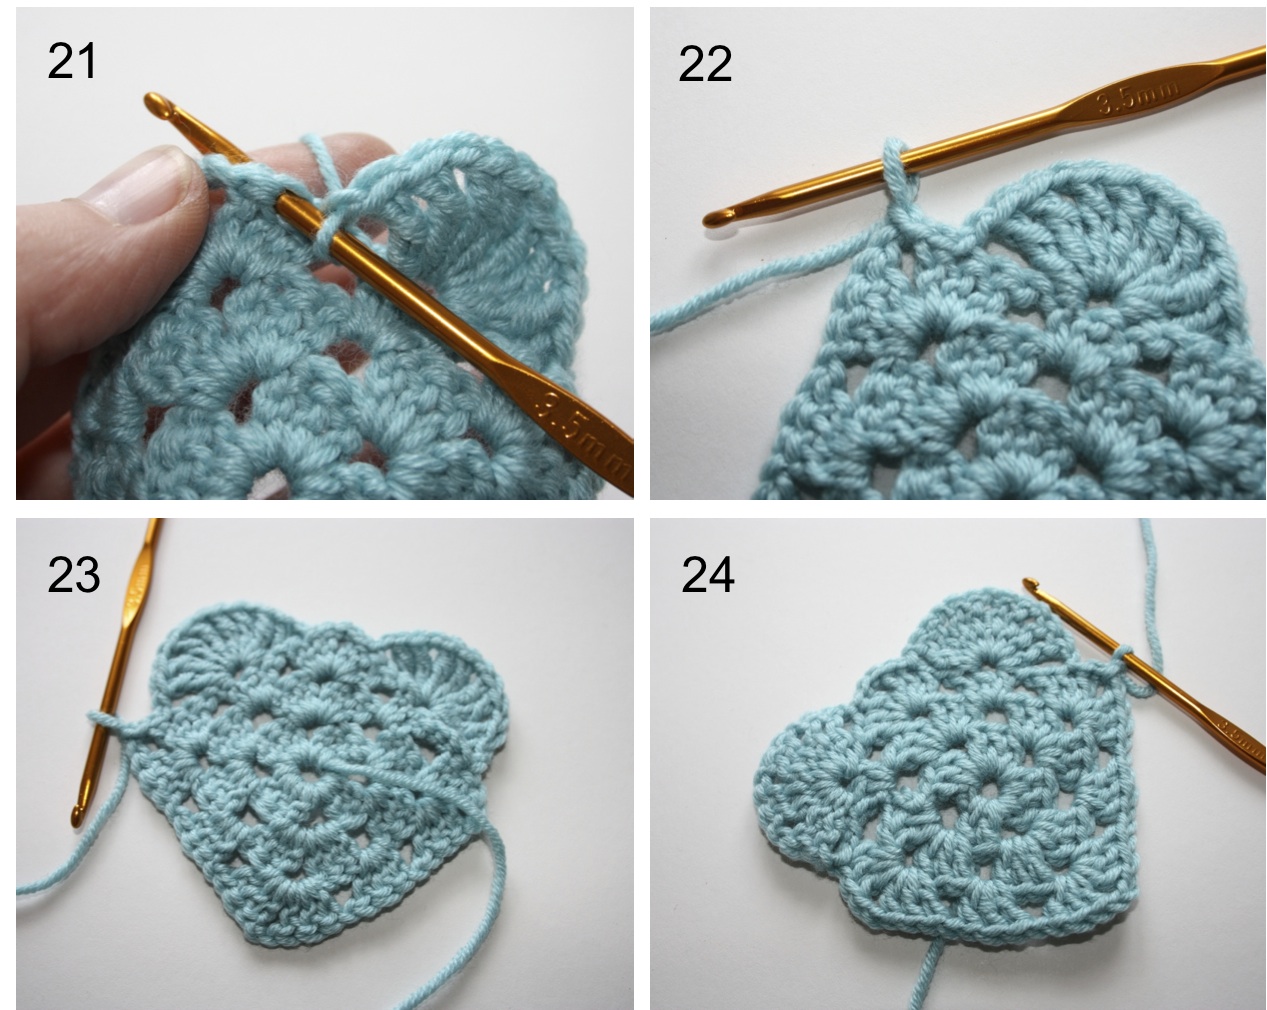
21. Go back to step 15 and follow the instructions for step 15, 16 and 17 through again, to make the second bump. The picture shows the last slip stitch to attach the second bump to the row below.
22. We need to get into position for the next row now, so slip stitch into the last treble of the cluster and then slip stitch once more into the corner space.
23. So this is what we have so far, it's starting to look a little bit heart shaped.
24. Now we need to turn the work back over, so the square is the right side up.

Row 5:
25. Make 2 trebles into the first chain space of the heart bump, then chain 1.
26. Now make 3 trebles into the second chain space on the heart bump, then chain 1. Then repeat this step two more times. Finally, make 2 trebles into the last chain space.
27. To finish, make a slip stitch into the corner space.

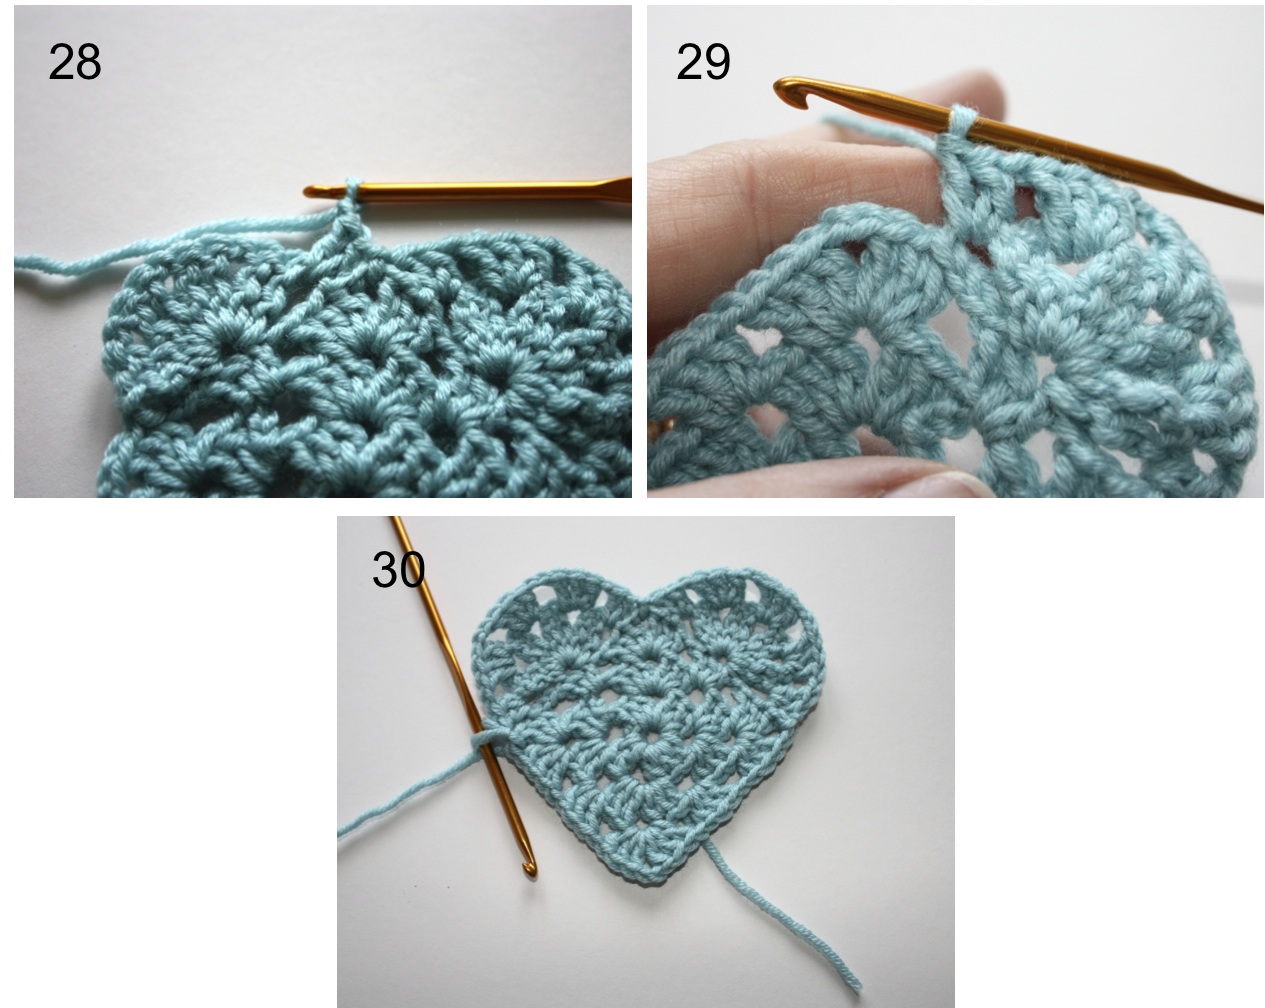
28. Repeat step 25 around the second heart bump.
29. Repeat steps 26 and 27 to finish the second bump.
30. When you're done, it should look like this. A heart shape!

Picot Edging:
We're almost there now, but to finish the thing of nicely, we're going to give it a picot edging.
31. Chain 1 and then to begin the picot, make a double crochet into the chain space, then chain 3.
32. To finish the picot, make another double crochet into the same chain space.
33. We now need to make 1 double into each of the trebles of the row below, you need to push that picot over a bit to fit into the first one.
34. Now you'll have made 1 picot and 3 doubles and you are ready to do the next picot into the next chain space. Repeat this around the heart, making a picot in each chain space and a double crochet in each treble.

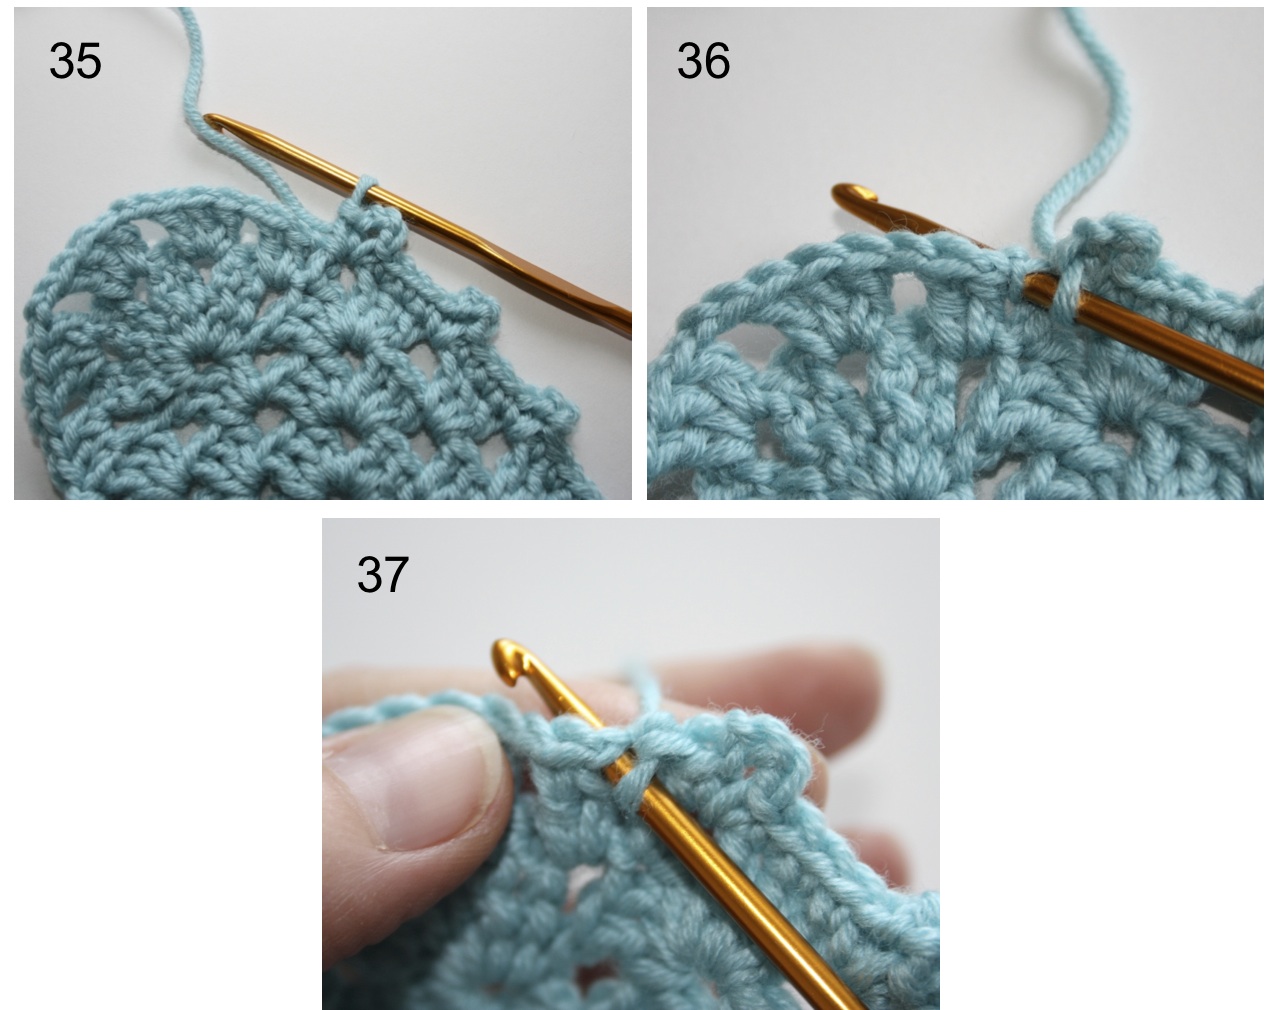
35. There are a couple of parts where this is tricky. The first you'll come to is where the heart bump joins the square. I make a picot in the chain space before the join as usual.
36. Now you have to make a double into each treble, but as there is only two trebles at this point, your first double will need to be in the turning chain, look closely at the picture to see where to put you hook. (Don't fret too much over this part though, just shove it in as best you can!)
37. Having done that, it can sometimes close the 2nd treble up a little, so give it a wiggle to push your hook through, like in this pic and then your back on track to continue with your last double and your next picot.

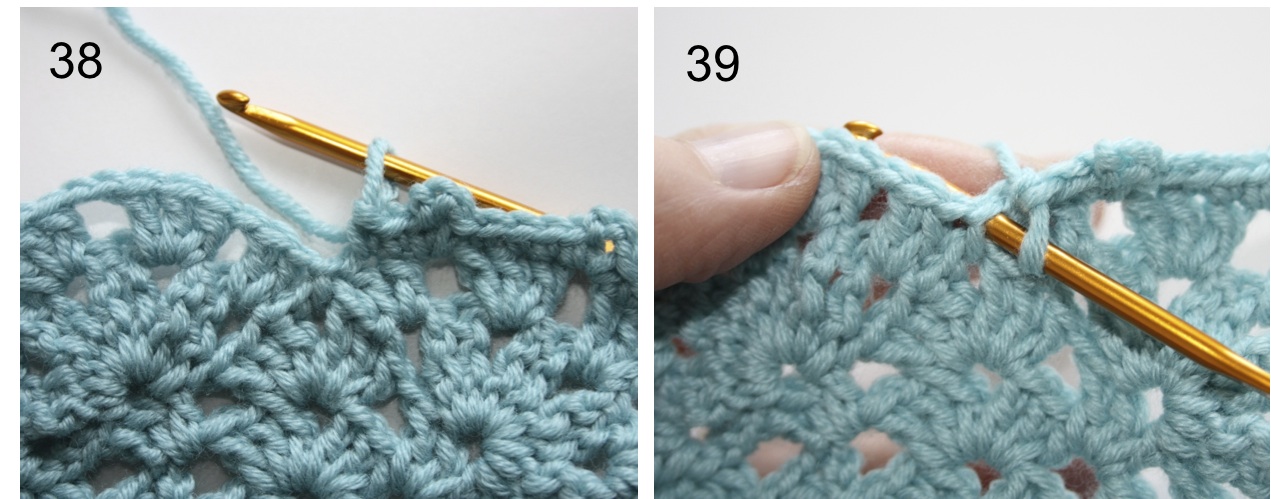
38. The next tricky part is the center of the top of the heart. The point where the two points join. We're not going to do a picot into this space beccause it'd look strange.
39. Instead, just make a slip stitch into the the slip stitch below and continue make double crochet's into the trebles, until you reach the next chain space.


So, here we go. My Grannie Heart Tutorial...
★★☆ - Improver
A few notes before we begin:
Yarn: I used Debbie Bliss Baby Cashmerino and a 3.5mm (E) hook, but you can use whatever yarn you like, just use the recommended hook size for your yarn.
Terms: I've used British crochet terms throughout, so I must apologise in advance to anyone who is used to using the American terms.
British (American)
Slip Stitch (Slip Stitch)
Chain (Chain)
Double (Single)
Treble (Double)
Double Treble (Treble)
WRITTEN PATTERN - If you'd like the written directions only, please visit the Cherry Heart Boutique and download the Granny Heart Bunting pattern, which contains the heart instructions.
☆ French instructions for the tutorial are now available - with many kind thanks to Katty at Sur Le Blog de Mes Loisirs for providing the translation.
Each step is numbered and corresponds to the picture numbers and you should (fingers crossed) be able to make the pictures even larger by clicking on them.

Foundation ring:
1. Make a slip knot
2. Chain 6
3. Insert the hook into the first chain you made, an join the chain with a slip stitch
4. Which will make a loop like this

Round 1:
5. Chain 5 (this will count as 1 treble and 2 chains). Then make 3 trebles into your foundation loop and then chain 2, we will need to repeat this twice more, so go ahead and do another 3 trebles and 2 chains, then another 3 trebles and 2 chains
6. To finish off this round, you need to do a further 2 trebles into the foundation loop and then join to the beginning of the round, by making a slip stitch into the 3rd chain of the chain of 5 that you made at the start of this round.
7. You should have something that looks like this. You have 4 'clusters' made up of the 3 trebles and 4 'corner spaces' where we chained 2.
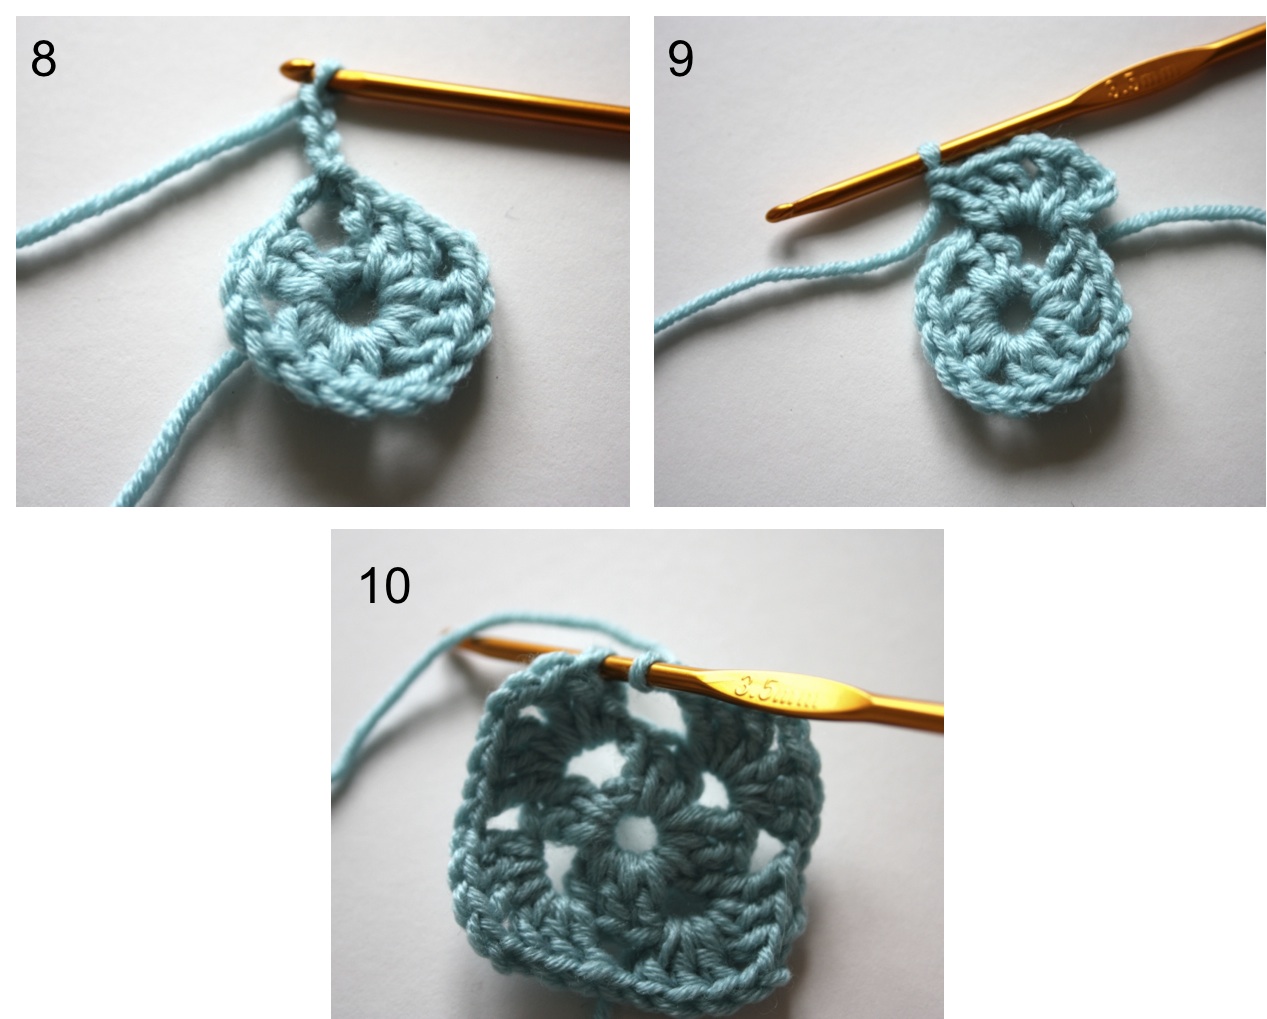
Round 2:
8. Make a slip stitch into the chain space in the corner and then chain 3
9. Make 2 trebles, chain 2, make a further 3 trebles, all into the corner space (this has made the first corner of round 2.
10. To make the rest of the corners first *chain 1, then into the corner space make 3 trebles, chain 2 and 3 more trebles. We'll need another two corners, so repeat the instructions from where I made the * mark two more times. Once you've done this, chain 1 and join to the beginning of the round, using a slip stitch into the 3rd chain of the original 3 chain.
This time we have made a 'corner space' in each corner with our 2 chains and also a 'chain space' where we chained 1 between clusters of trebles.
Round 3:
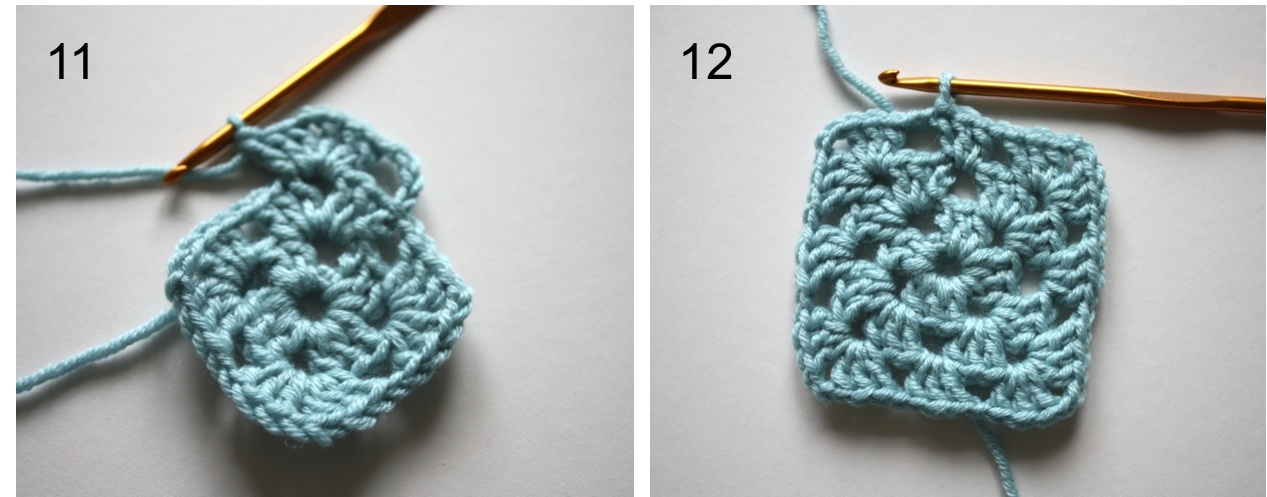
11. Chain 4 (this will count as a treble and 1 chain) and make your corners as we did before, 3 trebles, 2 chain, 3 more trebles all into the corner space of the round below
12. Chain 1, then make 3 trebles into the chain space of the round below, then chain 1. We need to repeat these last two steps around the square to finish the round, so *make another corner: (3 trebles, chain 2, make 3 trebles all into the corner space), then chain 1 and make 3 trebles into the chain space and then chain 1. You now need to repeat all the instructions from the * again to get around to the last side. To complete the round, make one last corner, then into the chain space you started in, make 2tr's and then make a slip stitch into the 3rd chain of the beginning chain of 4.
Row 4:
So the first thing to notice is that we are not going to be working in rounds for a little while. So, we'll be turning our work over soon!
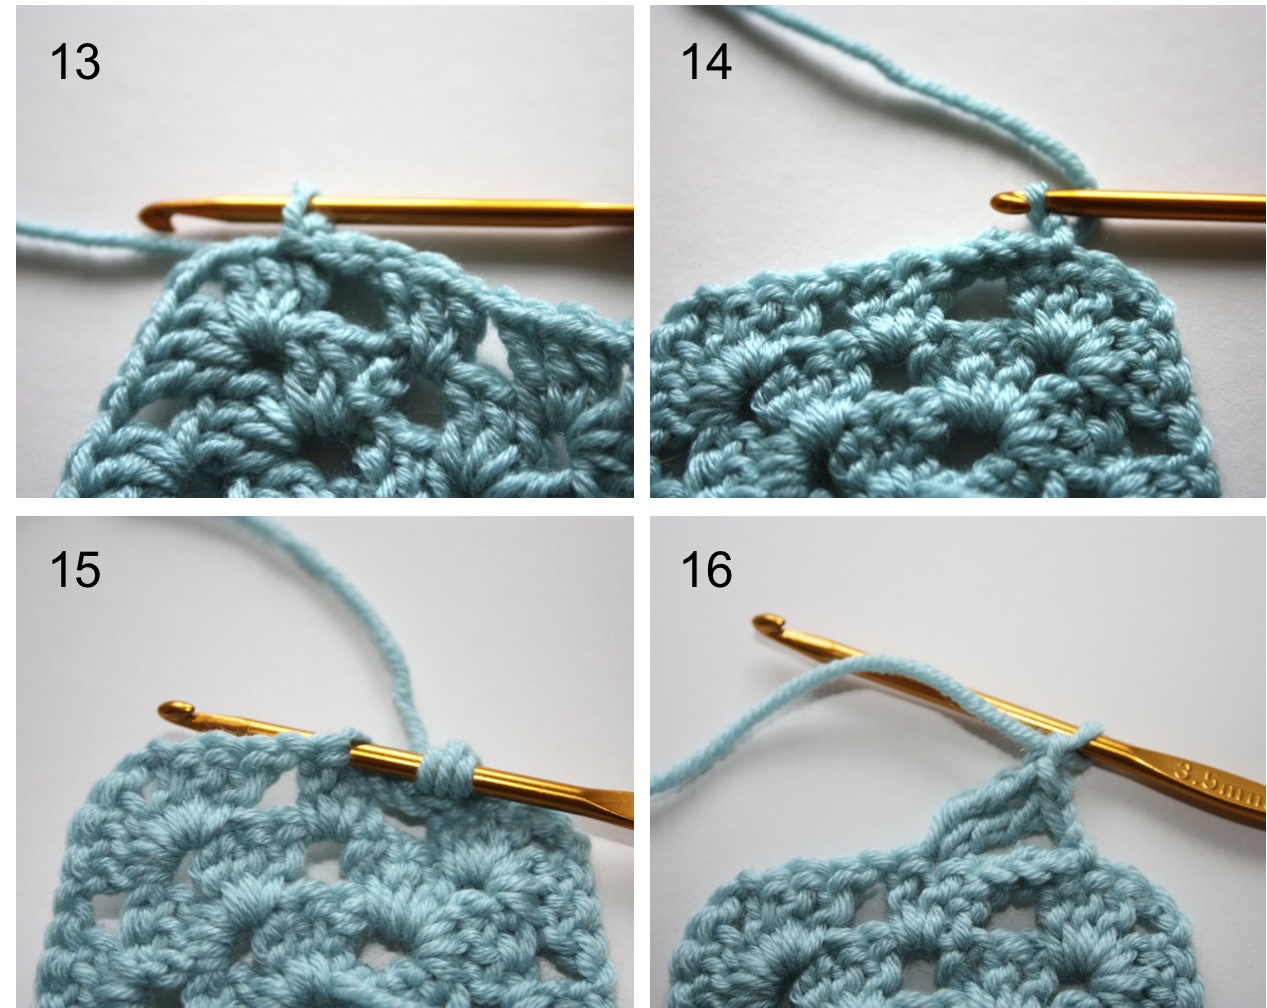
13. We need to be a little further along the square to start this row, so the first thing we need to do is slip stitch into the chain space and then make two more slip stitches into the next two trebles. This should leave you in the middle of the last cluster (as in the pic)!
14. Now make 1 chain and turn the work over. See we've got the bumpy back (wrong) side of the work in the pic now?
15. Now we are going to make the first of the 'bump shapes' that are going to form our heart. So, we need to make 2 double trebles into the middle treble, of the middle cluster of the row below, check the picture to see where I mean. Then chain 1.
16. You should have something that looks like this.
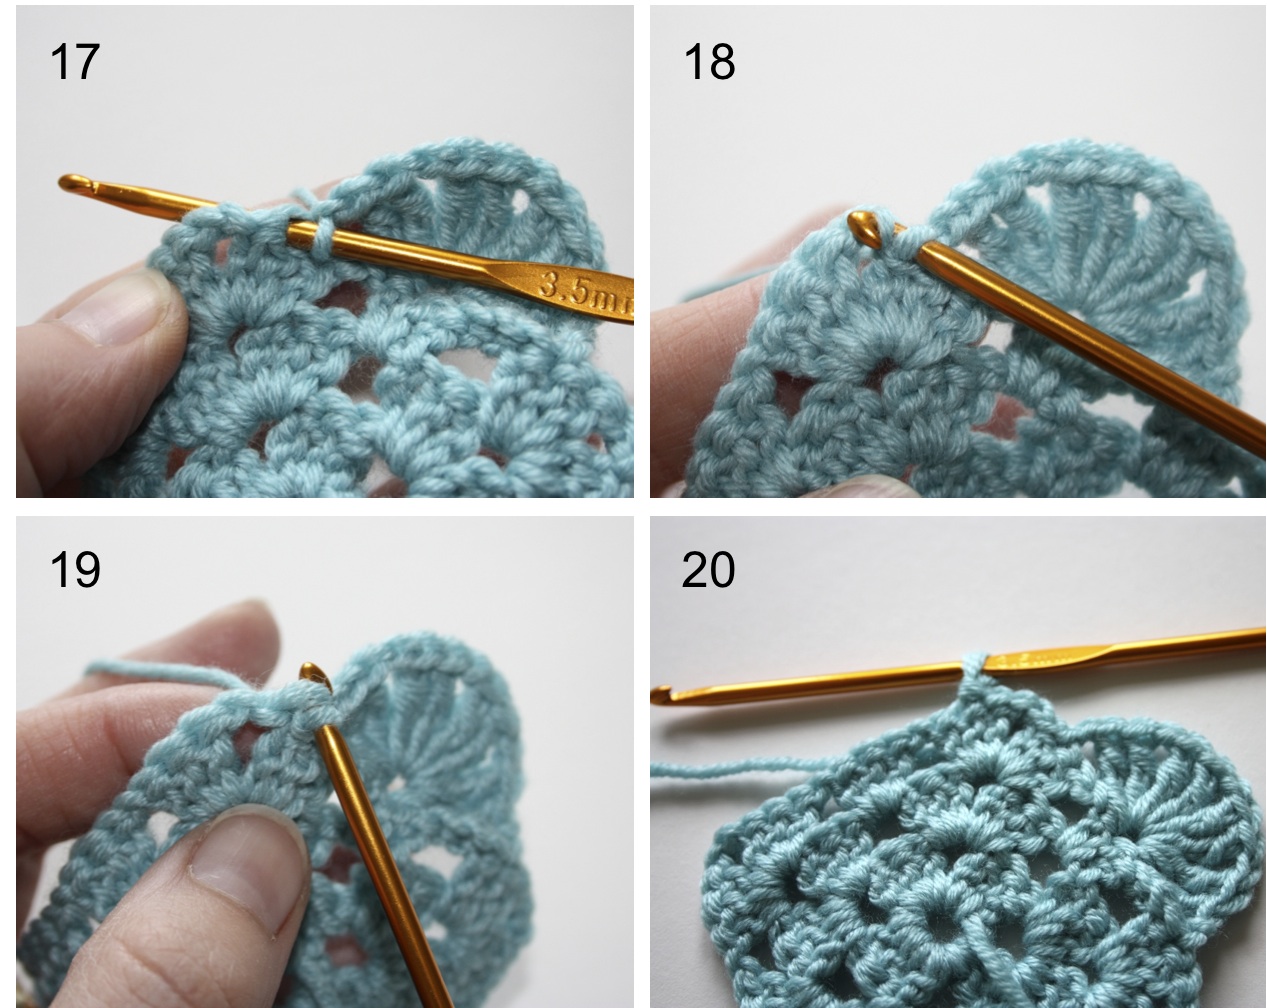
17. We need to repeat this so, *make another 2 double trebles and 1 chain and then repeat from the * twice more, so you have 4 sets of the double trebles all together. You then need to join this to the row below by making a slip stitch into the middle treble of the last cluster of the row below (see the pic).
18. Now we need to slip stitch round to the next position. Make a slip stitch into the next treble and then you'll need to make two more slip stitches, one into each of the corner chain.
19. These can be a little awkward to get your hook into, I use the pointing end first and it normally goes in after a wiggle! (Pic shows me hooking into one of the corner chains).
20. One final slip stitch into the first treble after the corner and then we are ready to make another heart shaped bump on this side of the square.
21. Go back to step 15 and follow the instructions for step 15, 16 and 17 through again, to make the second bump. The picture shows the last slip stitch to attach the second bump to the row below.
22. We need to get into position for the next row now, so slip stitch into the last treble of the cluster and then slip stitch once more into the corner space.
23. So this is what we have so far, it's starting to look a little bit heart shaped.
24. Now we need to turn the work back over, so the square is the right side up.

Row 5:
25. Make 2 trebles into the first chain space of the heart bump, then chain 1.
26. Now make 3 trebles into the second chain space on the heart bump, then chain 1. Then repeat this step two more times. Finally, make 2 trebles into the last chain space.
27. To finish, make a slip stitch into the corner space.
28. Repeat step 25 around the second heart bump.
29. Repeat steps 26 and 27 to finish the second bump.
30. When you're done, it should look like this. A heart shape!

Picot Edging:
We're almost there now, but to finish the thing of nicely, we're going to give it a picot edging.
31. Chain 1 and then to begin the picot, make a double crochet into the chain space, then chain 3.
32. To finish the picot, make another double crochet into the same chain space.
33. We now need to make 1 double into each of the trebles of the row below, you need to push that picot over a bit to fit into the first one.
34. Now you'll have made 1 picot and 3 doubles and you are ready to do the next picot into the next chain space. Repeat this around the heart, making a picot in each chain space and a double crochet in each treble.
35. There are a couple of parts where this is tricky. The first you'll come to is where the heart bump joins the square. I make a picot in the chain space before the join as usual.
36. Now you have to make a double into each treble, but as there is only two trebles at this point, your first double will need to be in the turning chain, look closely at the picture to see where to put you hook. (Don't fret too much over this part though, just shove it in as best you can!)
37. Having done that, it can sometimes close the 2nd treble up a little, so give it a wiggle to push your hook through, like in this pic and then your back on track to continue with your last double and your next picot.
38. The next tricky part is the center of the top of the heart. The point where the two points join. We're not going to do a picot into this space beccause it'd look strange.
39. Instead, just make a slip stitch into the the slip stitch below and continue make double crochet's into the trebles, until you reach the next chain space.

40. One you've made it back round to the beginning we just need to finish off by joining to the original picot. Here I've made my last picot and have made a double into two of the trebles below. Just one more to go.
41. Again, you may need a bit of force to fit that last double into that last treble, the picture shows where it should be going.
42. Finally, end the round by making a slip stitch into the first double crochet of your first picot, like this.
Break off the yarn, weaving in the ends..... and, ta da da da!! You should have one of these...
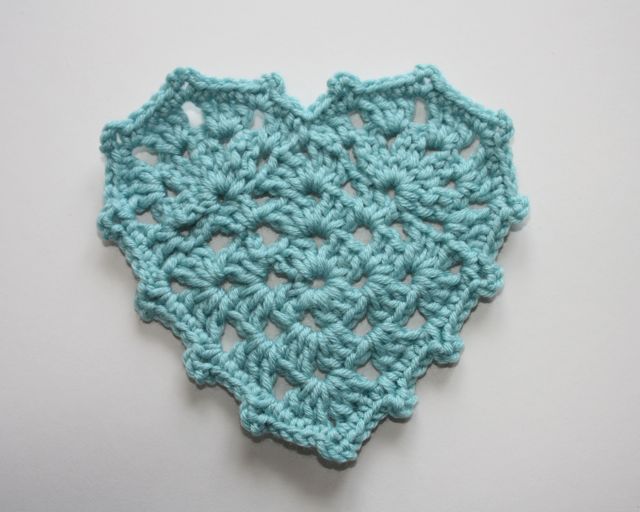
Isn't it wonderful? Aren't you pleased with yourself? I know I am!
So, now you've made one and it'll only ever be easier from here on in, why not make some more of them.....
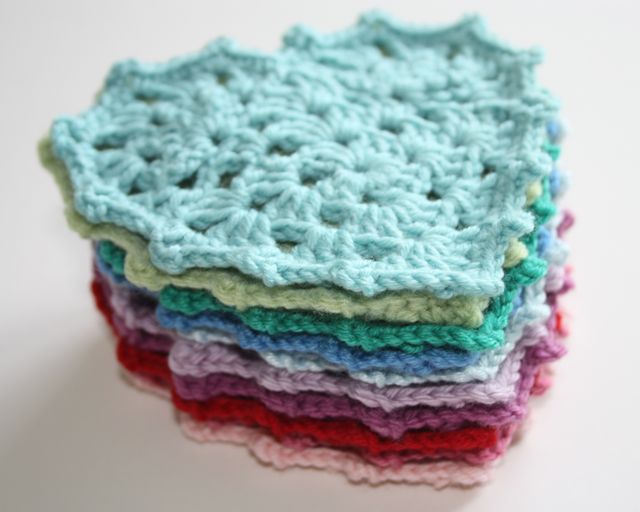
Until you have so many of them that you can mess around arranging them
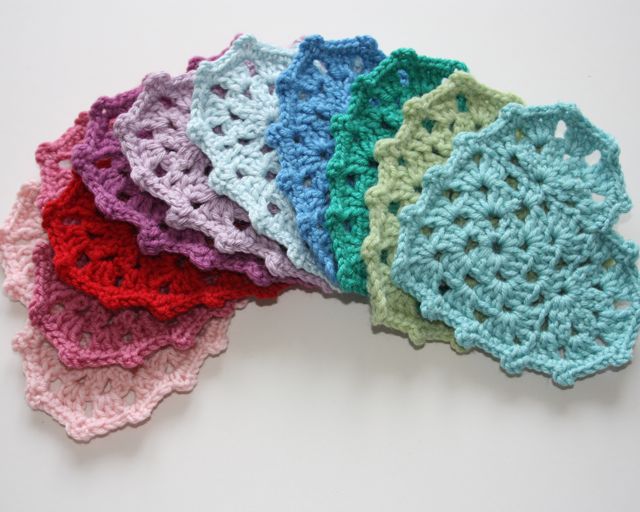
into daft patterns

or maybe

into some lovely bunting!
I hope you enjoy yourselves with this tutorial and making these hearts and I really hope that it's clear, easy to understand and I haven't made some dreadful mistake somewhere! Let me know if you think I have or if you have any other comments or suggestions, as this is my first, I'm sure I have a lot to learn.
Why not come and share your creations with us in Cherry Heart's Cozy Corner, my Ravelry group. It's a great place to go if you've got any questions too!
S x
Thank you so much for this tutorial, it's fabulous.
ReplyDeleteHi Sandra! Love this very pretty granny heart! Thank you for sharing the pattern! ~tina
ReplyDeleteThank you so much for sharing this pattern. I went straight to work when I saw it! Your tutorial is very clear.
ReplyDeleteThank you for your great tutorial!
ReplyDeleteI hope you don't mind I put you in the spotlight on a Dutch blog called: Deze is ook leuk.
~Audrey
Thank you, this is a great tutorial!
ReplyDeletegrt, Helmi
Wow, this is great. Thanx a lot for the tutorial. I am sure going to try it. I am your new follower. Why don't you visit my blog www.thelazyhobbyhopper.blogspot.com and have a look around. Have a nice weekend.
ReplyDeleteLove this!! Thank you.
ReplyDeleteGostei muito!Muito obrigada!
ReplyDeleteI just love these hearts, THANKS SO MUCH FOR SHARING!! I am gonna have to make some thing out of these to show them off, my mind is racing with ideas !!
ReplyDeleteThank you for sharing!wonderful tutorial!!!All the best!
ReplyDeleteBrilliant tutorial my Daughters love hearts so doing them both a set of buntings then another for my son's new home then hopefully a set or two for myself.. thank you so much.
ReplyDeleteyay! thank you so much for sharing the tutorial :) It was very helpful - and easy. My first heart came out too big because I used too thick yarn, but the next ones will be fine. I plan to decorate my room with there for the Valentines Day :)
ReplyDeleteLots of love!
Hi,
ReplyDeleteI LOVE this granny heart and all you have done with it. I have a question for you and thought it might be better done off-site. Would you please email me at butterflycrochet@gmail.com?
Thanks,
Wanda
Thank you for sharing such a wonderful tutorial! These are just lovely, and so easy to make. =D
ReplyDeleteYour heart is awesome thanks so much for sharing it!
ReplyDeleteis this uk instructions?
ReplyDeleteIt certainly is! (I mention it at the top of the instructions.)
DeleteS x
bellissimo grazie
ReplyDeleteLooks like fun... thanks for sharing!
ReplyDeleteThank you so much. I've found many but these are beautiful and I can't wait to start making one
ReplyDeleteLove these hearts they are beautiful. Thanks for sharing!
ReplyDeleteEven being left handed i managed to fudge my way through! love it!
ReplyDeleteThis is the first I've seen your blog ~ I think I just died and went to crochet heaven!! I've been crocheting for 43 (eek! did I just say that!) years and LOVE, LOVE, LOVE to see new ideas and creativity. I have signed up to receive emails ~ woohoo!
ReplyDeleteI am SO addicted to making these. Seriously, I can't stop. (That might be because of the OCD. lol) I love this granny square pattern because it kinda reminds me of a flowere.
ReplyDeleteAnyway, I now have a bunch of these laying around and have no idea what to do with them. At first I thought maybe I would make a Stars and Heart blanket (I have a pattern for stars), but I'm tired of making blankets. So I went to the craft store and bought some ribbons for the front and magnets for the back. I've also been playing with different edgings.
I decided to hand them out as Valentine's this year.
Thank you SO very much for sharing with us. I looked all over for heart shaped crochet patterns and this is by far the BEST one I found!
Beautiful first tute! I am fairly new to crochet and appreciate all the wonderful pictures and details! thank you.
ReplyDeleteThis is a great pattern. Fun to make.
ReplyDeleteMine came out a little large. I didn't notice a materials list.
What hook size did you use and what yarn do you suggest?
Hi TuesDowd,
DeleteYou have no email address on your profile so I couldn't reply to you directly but I'll leave the answer here and hope you find it!
You can basically use whatever weight yarn you like, with an appropriate size hook as it's not really crucial what size the hearts come out. However, I used a light dk yarn and a 3.5mm hook (that a E hook if you're in the US)
Hope that helps :)
S x
Hola. Descubrí tu blog a través de tangled happy buscando corazones. Gracias por compartir el tutorial y perdona si te he molestado al no enviarte antes este mensaje de agradecimiento. Lo siento mucho.
ReplyDeleteUn saludo.
Susana.
It's so lovely heart with Granny!
ReplyDelete♥Crissi♥
Going to crochet this granny heart right now...love it!
ReplyDeleteYes, it is wonderful...and, yes I am pleased with myself. Excellent tutorial for this sweet heart. Many thanks!
ReplyDeleteBeautiful! I bookmarked this post, so I can use it later (working on other things now). Thanks for sharing!! Liz
ReplyDeleteI love this pattern ... I found you on pinterest and couldn't wait to try, so I've already done one (only took me about 30 minutes) and I can't wait to make more! ... thanks for sharing!
ReplyDeleteThank you so much for this tutorial, loving whipping up some hearts for a string of bunting.
ReplyDeleteI have two teeny observations. First in the printed instructions if you follow them literally you would "turn" the heart again before doing the second bump.
Also, I have realised why my first five hearts don't look quite right, I did 5 double treble clusters as the instructions said 2 DTR 1 ch then repeat 4 times...which I took to mean 5 in total and it looks like it should be 4, as you have in the tutorial.
Me being a bit slow!!
Thank you again, love them :)
Fiona (KnitKnatKnotUK)
those are so~ beautiful!! thanks for sharing the lovely pattern. i should try this very soon!!
ReplyDeleteBeautiful project!! I love crochet!!
ReplyDeleteI love it!! Thank you for your tutorial!! Grtzz from Holland..
ReplyDeleteMany thanks, Sandra!
ReplyDeleteIt is an honor for me that you tell me you like what I do. You really have a beautiful blog, full of pretty things and wonderful creations!
Thank you for your comment in
http://www.myworldofwool.com/
I've been poking about your lovely site and I've just discovered this! I'm definitely going to making this! Thank you for the tutorial!
ReplyDeleteI just realised I used your tutorial a few months ago and have now stumbled upon your blog through my creative space. Thanks its a great tutorial. I have posted on my blog some hearts I made - I hope I linked back ...sorry I can't remember! Suz
ReplyDeleteTHANK YOU VERY MUCH LOVE IT WOULD MAKE PRETTY LAP BLANKETS OR BABY
ReplyDeleteThank you, I am some what passed beginner and the only thing I was concerend about was the language but have followed along well. I am excited to think about how to create and item. Will be happy when I get lots made and surpries my crochet group.
ReplyDeleteThis is beautiful... any tips on how to join them?
ReplyDelete
DeleteHi,
I guess you could top and tail them to make strips to join together. You could either join the picots together in the 'join as you go' method. Or you could leave off the picot round and just sew them together.
Or, you could maybe join sets of 4 hearts together, points all to the centre and make groups of hearts that way. You know, I never thought of these hearts becoming a blanket when I first designed them. It's so great that they might be used in so many other ways!
S x
Thank you so much for posting this lovely pattern - it has kept me sane this cold snowy afternoon in Bulgaria!
ReplyDeleteJak
I would like to know how to join them as well. Found this pattern through a crochet newsletter that listed this under afghans! The heart is so pretty! I like how lacy it looks. :) My granddaughter who is three is a girly girl who loves ballet, bling, and pink, would love this! Just have to figure out what to make.
ReplyDeleteThank you! :)))
ReplyDeleteThank you so much for this tutorial. I just made my first heart and it turned out beautifully.
ReplyDeleteThank you so much for this! I had printed the ravelry pattern but didn't understand rows 4 and 5. But with your tutorial it was very easy :-) I just finished making the hearts and will be joining them soon. I'll post the finished product on my blog this week. Thanks again!
ReplyDeleteMe, too! I wanted to make something to show off a little necklace for my granddaughter for Valentine's Day. I made it in size 10 thread with a 2mm hook and it's just adorable. I think I'll make one in size 30 (very fiddly, I know) as a lacy bookmark! Your design, and your great illustrative steps made it all possible. Thank you vary much, and Happy Valentine's Day!
ReplyDeleteSounds wonderful! I hope the lacy bookmark idea works out too, that sounds great too. So glad you liked the tutorial and I love that it can be adapted so much. :D
DeleteS x
Hi Sandra, thank you so much for the tutorial, its very clever, and easy to understand and I enjoyed making a heart this evening. I did find one tiny mistake, in part 26 you need to do three trebles three times, where as your instructions say just twice. I'm not criticising at all, its super duper, and I'm no pattern writer myself, so I do bow to your superior knowledge and I'm sorry if I'm wrong, I just found I needed to do it that way! Thanks again, I do love your blog!
ReplyDelete